Chapter 2

Chapter 2 |
|
In class, you have learned about writing Java programs. In this lesson, we will learn how to take a Java program that you have written and actually compile it and then run it on the computer. Your text refers to a java environment for writing, compiling, and running Java programs. There are several integrated development environments (IDE) available that facilitate this process. However, they all tend to be quite complex and sometimes too involved for a beginner like you. We will introduce you to an IDE later in the semester. For now, our Java development environment will comprise of three basic tools:
By now, we will assume that you have successfully logged in and created a cs110 folder for doing all your work. If you have not yet done this, go back to Chapter 1. When you log in, your home folder should look as shown below.
Also, you will need to have a Java program ready to try this. We will use the following program as our example:
/** HelloApp.java
 *  A first Java program that uses the Wheels library (Sanders & van Dam)
 *  to draw a conversation bubble that says, "Hello, World!"
 */
public class HelloApp extends wheels.users.rame {
    private wheels.users.ConversationBubble _hello;


    public HelloApp() {
        _hello = new wheels.users.ConversationBubble("Hello, World!");

    }


    public static void main(String[] args) {

        HelloApp app = new HelloApp();

    }

} // end of class HelloApp
Figure 1: A first Java program.
Now that you have a Java program our next step is to enter it in a file using
the editor.
A text editor is a simplified version of an application like Word that you may have used to create documents. We will use the editor called, gedit, to create a Java program file. In order to start the editor, go to the Applications menu on your desktop panel, select Accessories, and then select, Text Editor. A new editor window will pop up and look like this:
![]()
Figure 2: The empty editor window.
Just as you would an any document preparation system, go ahead and enter your Java program as typed above. Then save the file, using the File -> Save As... menu option. This will give you the Save as... dialog box as shown below:
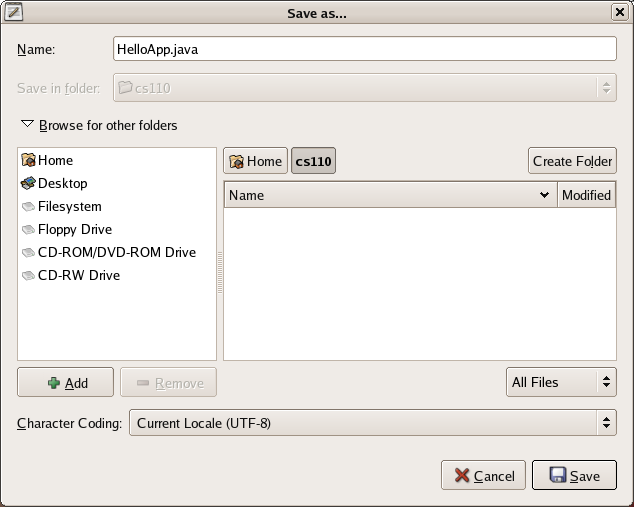
Figure 3: Saving your Java program
Navigate over from your home directory to the cs110 folder (see the cs110 tab above following the Home tab) and then enter the name of the source code file for this program in the Name: box as shown. Notice that the name of the file being specified is HelloApp.java. This is important! The name of the file should be exactly the same as the name of the class you defined, followed by the extension.java (this indicates that this is a Java source code file).
Hit Save after entering the file name. The file will be saved and the dialog box will disappear. You will now see the following editor window:
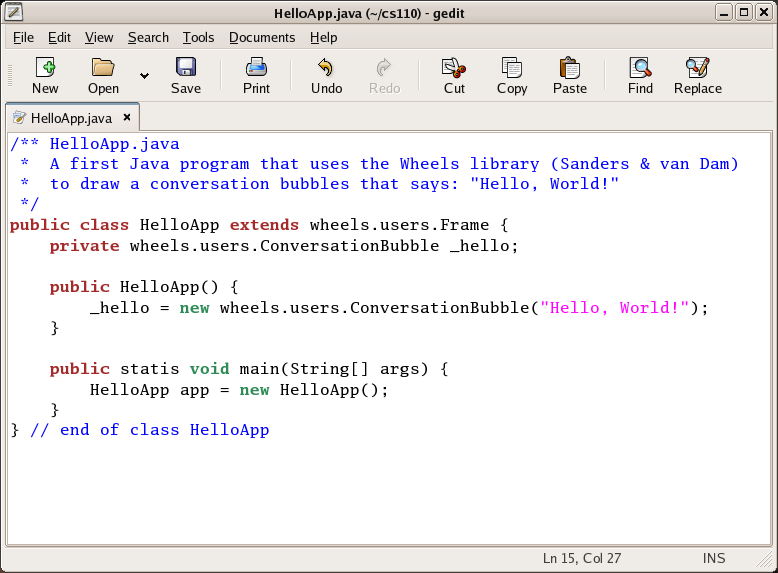
Figure 4: Text Editor window with the Java program
Notice how the Java program is color coded (comments are in blue, keywords are in red, strings are in pink, etc.). This makes it easy to read your program. If you'd like, at this point, you can also print a copy of this program in the printer by selecting the Print button in the editor window.
Next, we can now try and compile the program using the java compiler (javac). In order to compile the program, we need to open up a Terminal window that will give us a command line interface where we can enter the commands to compile and run. To get a Terminal window, select the Applications menu from the desktop panel, followed by System Tools -> Terminal. You will get a Terminal window as shown below:
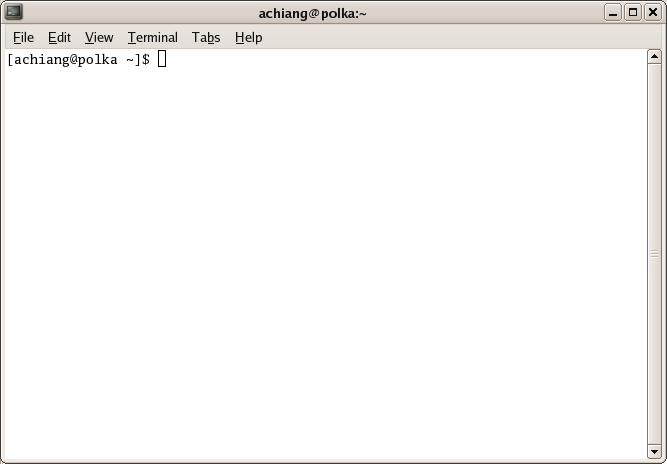
Figure 5: A Terminal Window
The window above provides a basic command line interface (CLI). The line above that reads: [achiang@polka ~]$. This is called a prompt. If you activate this window (just by clicking your mouse anywhere on it) whatever you type will appear as a command against the prompt in the window. Linux has a whole library of commands that you can type that you can use to do different things on the computer. Typically, the commands tend to be a little cryptic, but once you get the hang of them, you will love the way all this works! We will, of course start slow...
Select the window, and enter the command:
cd cs110
This is shown below:
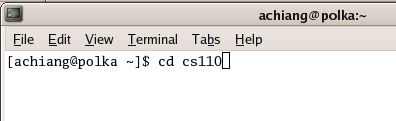
Figure 6: Changing directory to cs110
Then, hit the RETURN key and you will see:
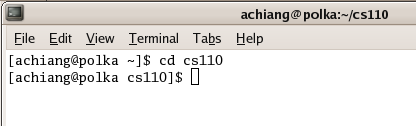
Figure 7: After changing the directory to cs110
Notice the prompt now reads: [achiang@polka cs110] $. That is, you have successfully navigated into the cs110 folder (the command cd stands for change directory). Next, enter the command:
ls
This is short for list and you use it to see the contents of the current directory/folder. The contents are displayed (in this case, the file you created is shown):

Figure 8: Results of the ls command
Now, we are ready to compile. enter the command:
javac HelloApp.java
At this point, if you entered a syntactically correct Java program, you will just get a prompt back, or you will get a list of error messages followed by the prompt. Here is what happened with the file that was saved above:
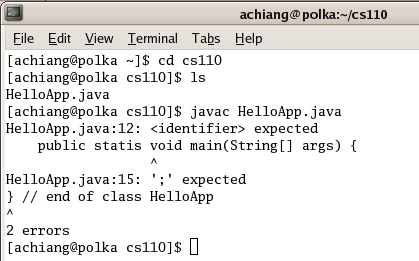
Figure 9: Compiling using javac (and looking at syntax errors)
The compiler is complaining that on line#12, at the word void there is something wrong (<identifier> expected). Look closely and you will see that I mistyped the word static as statis. Since it was unable to determine the meaning of statis, it pointed out the error. You will experience this quite a lot while working on your programs. The error needn't be pointed out exactly where it occurred, but somewhere nearby (in this case just before the word void).
Go back to the editor window and correct the error (the second error pointed out was related to the first one, so there is nothing to correct there!). And then recompile the program. You will not get any error messages, and you will just get your prompt back. At this point check to see the contents of the directory again (using ls). This is shown below:
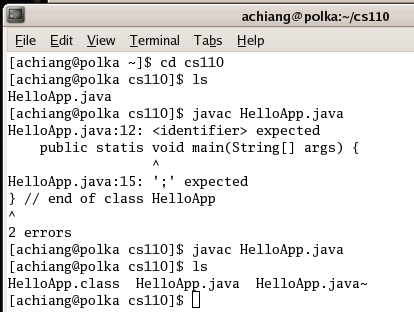
Figure 10: Re compiling (successfully...see bottom part of the screen) and looking at directory contents (ls)
Notice that the folder now contains three files: HelloApp.class HelloApp.java and HelloApp.java~
The first file (HelloApp.class) is the result of successful compilation of the Hello.java file. The file, HelloApp.java~, is a backup file created by the editor when you made changes in it. This is just in case you wanted to revert your changes...you can ignore that for now).
Once your program is successfully compiled the program (you have produced a HelloApp.class file), you are ready to run/execute it and see if it does what it was supposed to do (remember?!). You can do this by typing:
java HelloApp
The Java runtime system will load your class definition and follow what you specified in the main method. In this case, you will get a window pop-up with the following contents:
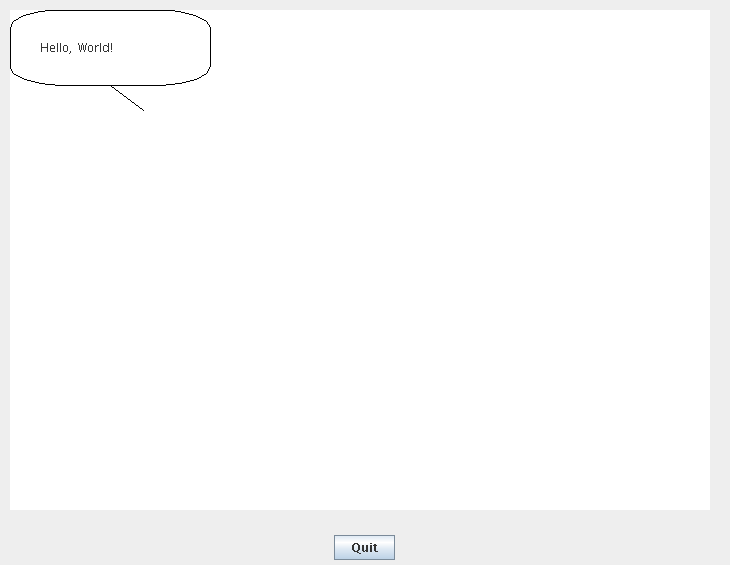
Figure 11: Cool!
Phew! That was a lot of stuff!! We just made one pass through it. Go over the steps one more time, just for practice. After a while, these steps will become second nature, since you will be doing them over and over again for several projects. Once again, here are the steps to writing and running Java programs:
Of course, now that you can run the program, you can get into the testing and follow-up phases. More on that later. For now, review these steps.
And, take a break!!